Add Member: verschil tussen versies
(→How To Add New Member) |
|||
| (3 tussenliggende versies door dezelfde gebruiker niet weergegeven) | |||
| Regel 3: | Regel 3: | ||
== Personal Info Tab == | == Personal Info Tab == | ||
[[Bestand:Add-member.png]] | [[Bestand:Add-member.png]] | ||
| + | |||
This tab focuses on gathering essential information about the member. The fields included are: | This tab focuses on gathering essential information about the member. The fields included are: | ||
<ul> | <ul> | ||
| Regel 18: | Regel 19: | ||
==Address Tab== | ==Address Tab== | ||
[[Bestand:Add-member2.png]] | [[Bestand:Add-member2.png]] | ||
| + | |||
The Address tab is dedicated to collecting the residential or workplace address of the member. The fields include: | The Address tab is dedicated to collecting the residential or workplace address of the member. The fields include: | ||
<ul> | <ul> | ||
| Regel 33: | Regel 35: | ||
==Cards & Access Tab== | ==Cards & Access Tab== | ||
[[Bestand:Add-member3.png]] | [[Bestand:Add-member3.png]] | ||
| + | |||
This tab is used to manage the cards and access rights associated with the member. The fields and functionalities include: | This tab is used to manage the cards and access rights associated with the member. The fields and functionalities include: | ||
<ul> | <ul> | ||
| Regel 46: | Regel 49: | ||
This tab is crucial for managing the physical and digital access rights of the member, ensuring they have the appropriate permissions to enter secure areas or access sensitive information. | This tab is crucial for managing the physical and digital access rights of the member, ensuring they have the appropriate permissions to enter secure areas or access sensitive information. | ||
| + | |||
| + | == How To Add New Member == | ||
| + | <ul> | ||
| + | <li> | ||
| + | <strong>Personal Info Tab</strong>: This tab holds info for the member (full name and email are required). | ||
| + | </li> | ||
| + | <li> | ||
| + | <strong>Address Tab</strong>: This tab holds member address tab. | ||
| + | </li> | ||
| + | <li> | ||
| + | <strong>Cards & Access</strong>: | ||
| + | <ul> | ||
| + | <li> | ||
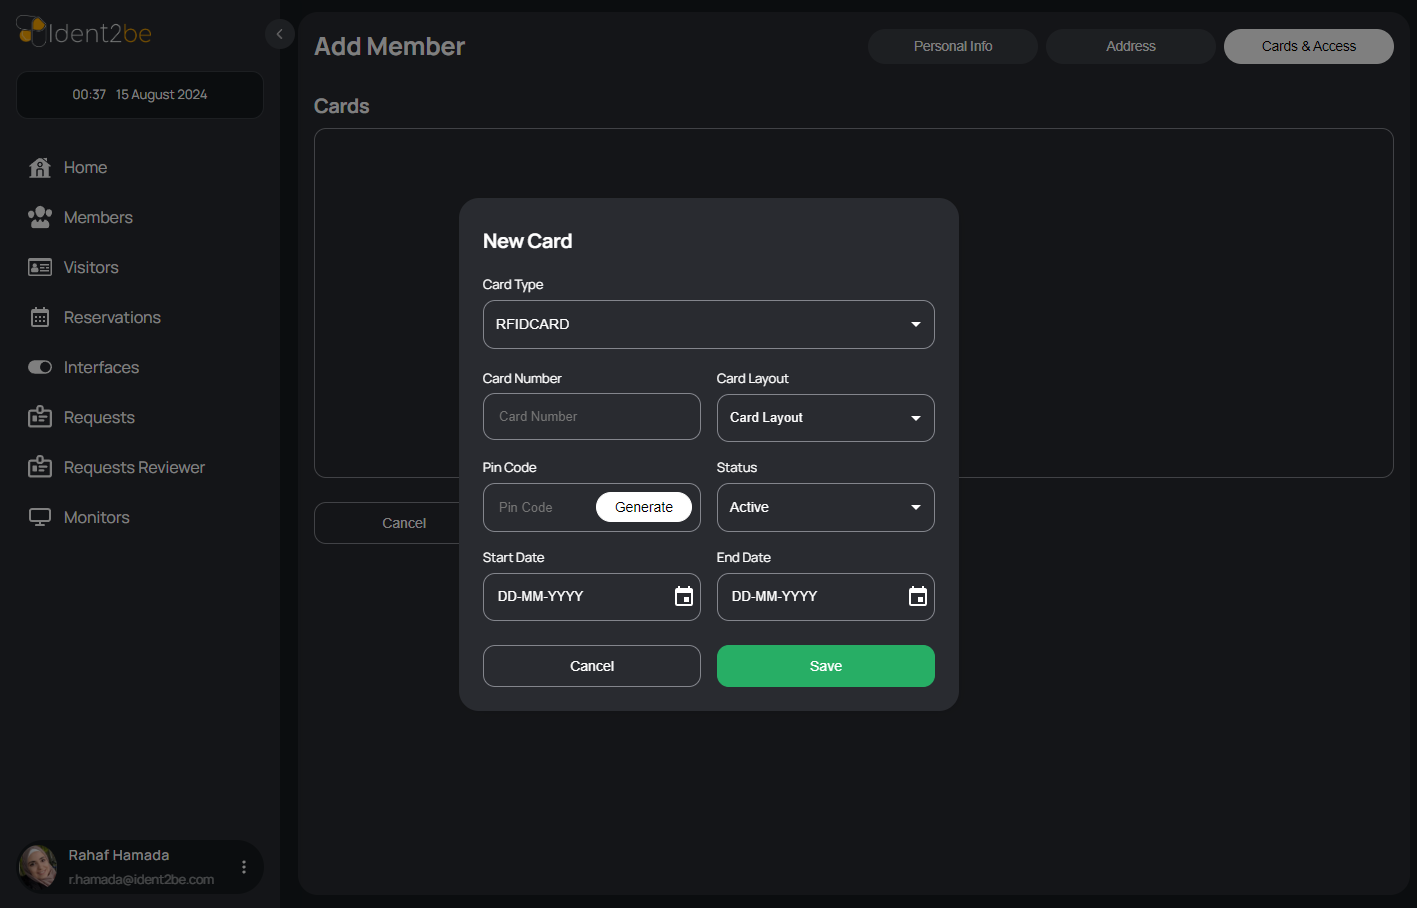
| + | <strong>Add Card Button</strong>: In this tab you add cards to the member by pressing add card then a popup will be opened. | ||
| + | </li> | ||
| + | <li> | ||
| + | <strong>New Card Popup</strong>: In this popup you choose card type and insert data for this card ( card number is required ). | ||
| + | </li> | ||
| + | <li> | ||
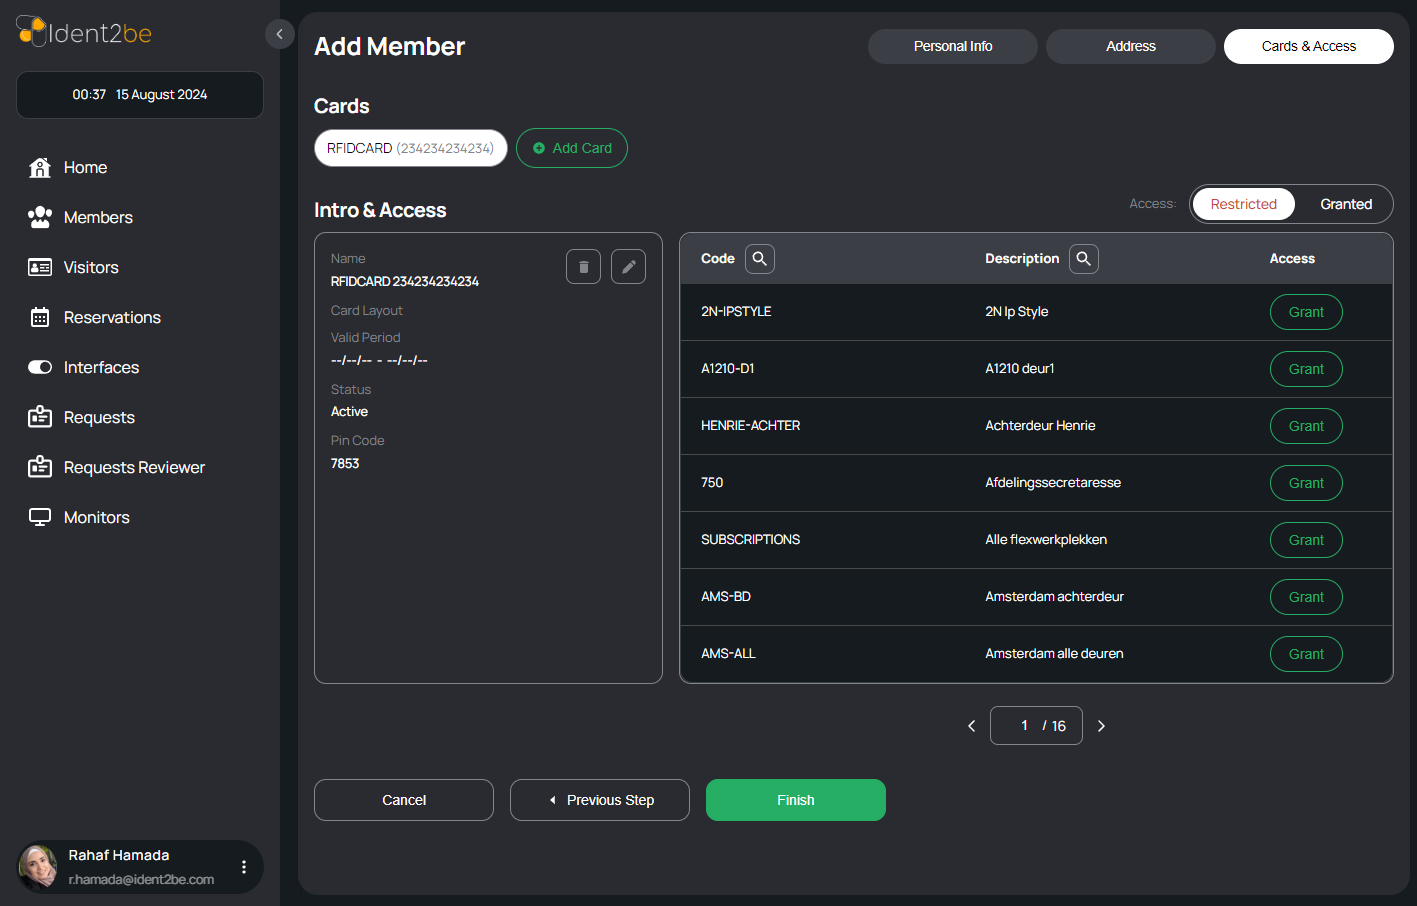
| + | <strong>Card Details</strong>: In this section you can see card details you added and can add access to this card in the table at the right. | ||
| + | </li> | ||
| + | <li> | ||
| + | <strong>Card Details Actions</strong>: In card details section you have edit icon to edit this card and delete icon to delete this card. | ||
| + | </li> | ||
| + | </ul> | ||
| + | </li> | ||
| + | </ul> | ||
==Summary== | ==Summary== | ||
The "Add Member" page is a comprehensive form designed to capture all necessary details about a company member. By organizing the information into three distinct tabs—Personal Info, Address, and Cards & Access—the page ensures a structured and thorough collection of member data, streamlining the process of member management within the company's system. | The "Add Member" page is a comprehensive form designed to capture all necessary details about a company member. By organizing the information into three distinct tabs—Personal Info, Address, and Cards & Access—the page ensures a structured and thorough collection of member data, streamlining the process of member management within the company's system. | ||
Huidige versie van 25 aug 2024 om 17:41
The "Add Member" page in your application is designed to facilitate the creation of new company members. It consists of three primary tabs: Personal Info, Address, and Cards & Access. Each tab is dedicated to capturing specific information about the member, ensuring that all relevant details are collected in a structured manner.
Personal Info Tab
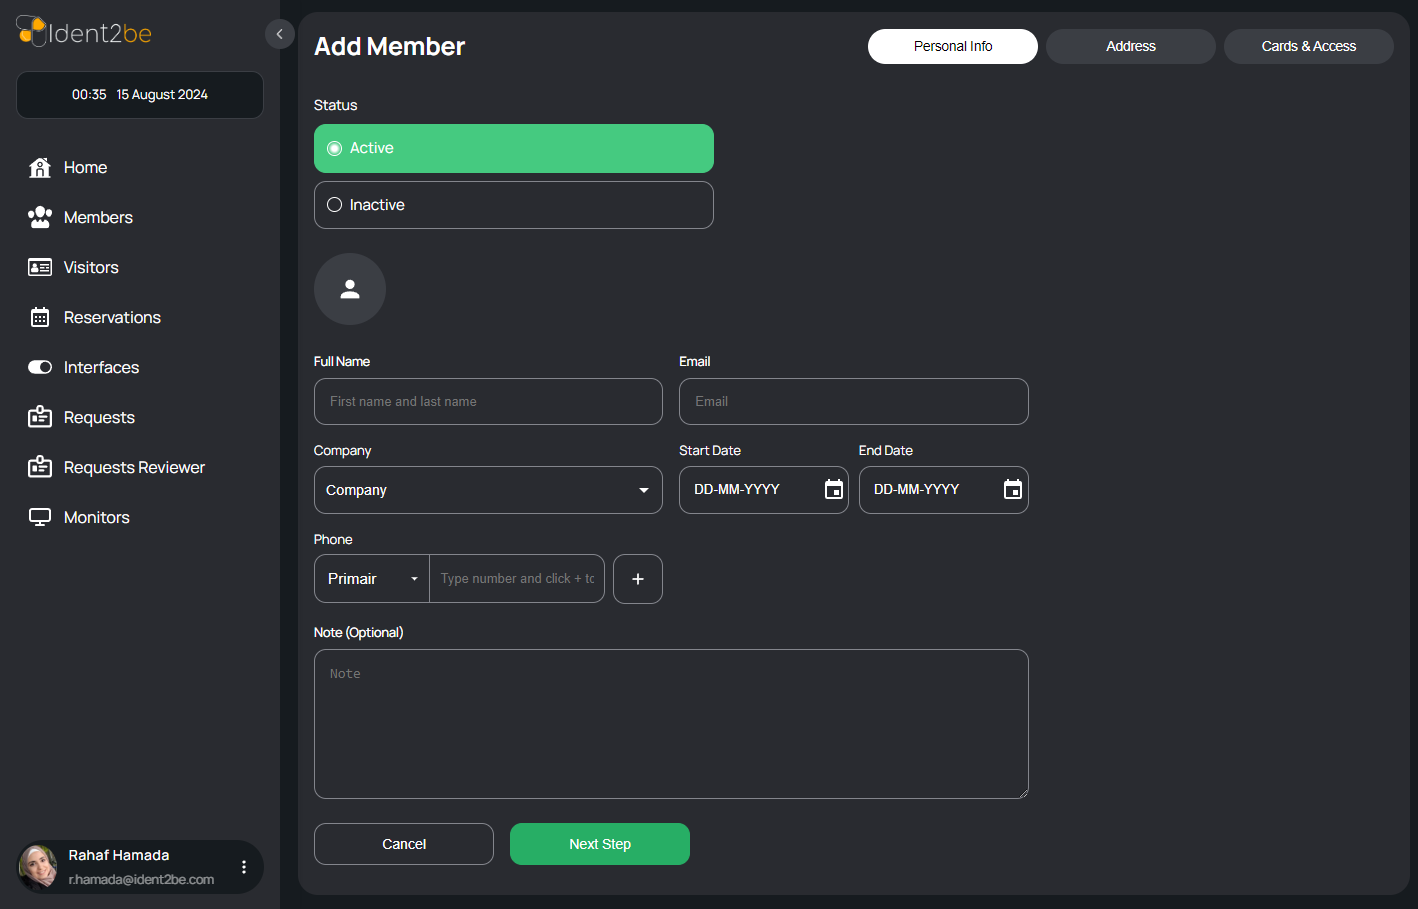
This tab focuses on gathering essential information about the member. The fields included are:
- Status: The first option at the top allows you to set the member's status as either "Active" or "Inactive."
- Full Name: A text input field where the full name of the member is entered.
- Email: A field to capture the member's email address.
- Company: A dropdown menu where you can select the company the member is associated with.
- Phone: A section to input phone numbers, with options to mark numbers as "Primary," "Secondary," etc. You can add multiple phone numbers by clicking a "+" button.
- Start Date: A date picker that allows you to select the start date of the member’s association with the company.
- End Date: A date picker to choose the end date of the member's association (if applicable).
- Note (Optional): A text area where any additional notes or comments about the member can be entered.
This tab is intended to capture all basic details required to create a member profile within the company's system.
Address Tab
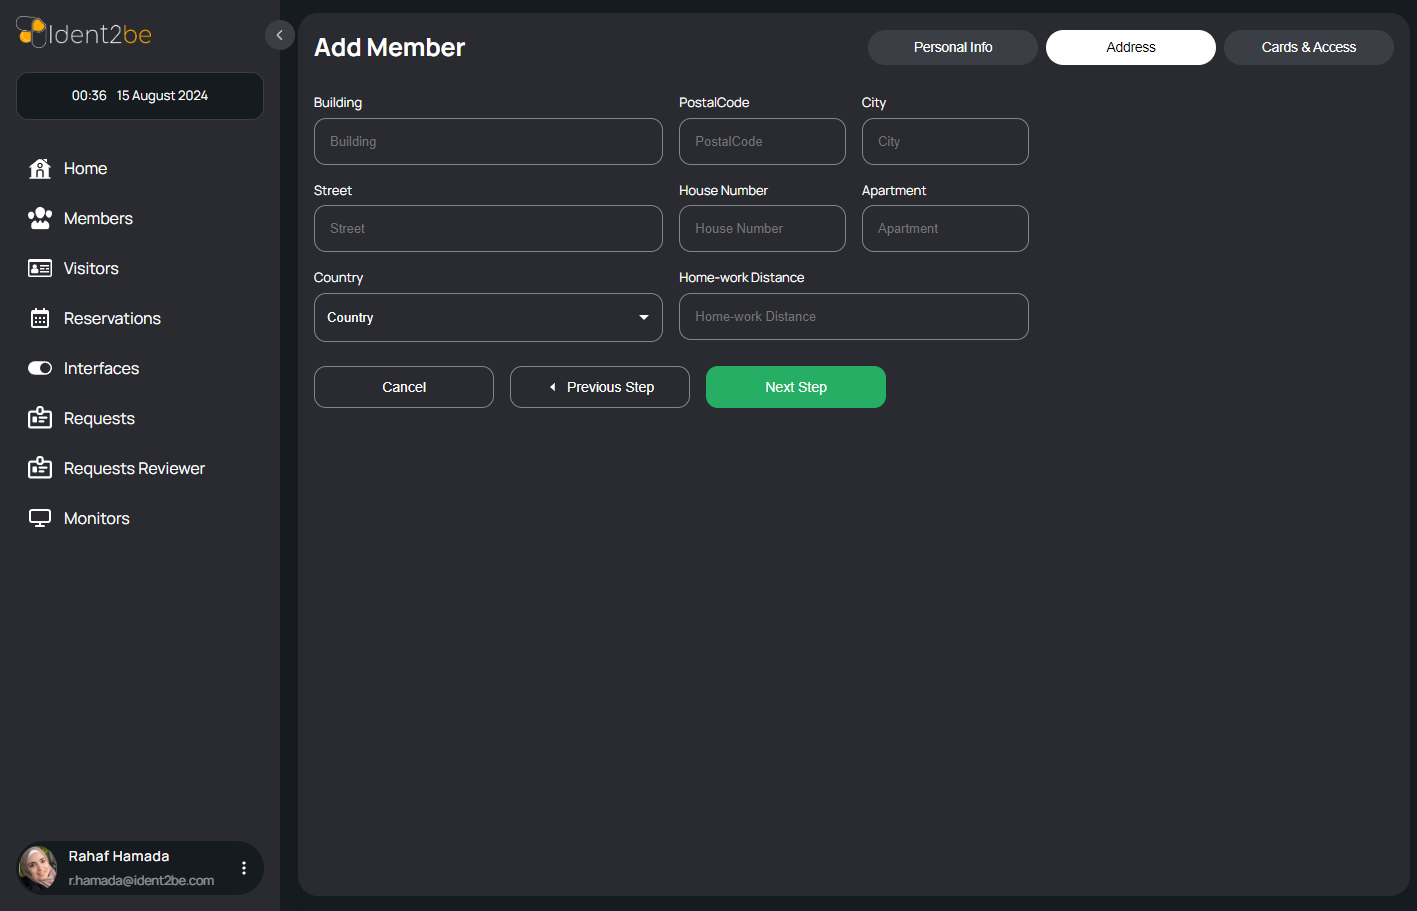
The Address tab is dedicated to collecting the residential or workplace address of the member. The fields include:
- Building: The building name or number where the member resides or works.
- Street: The street name of the member's address.
- Postal Code: The postal code corresponding to the member's location.
- City: The city in which the member resides.
- Apartment: An optional field for specifying the apartment number if applicable.
- House Number: A field for the house number associated with the address.
- Country: A dropdown menu to select the country of residence.
- Home-Work Distance: An optional field to enter the distance between the member's home and workplace.
This tab ensures that detailed location information about the member is accurately captured for logistical and contact purposes.
Cards & Access Tab
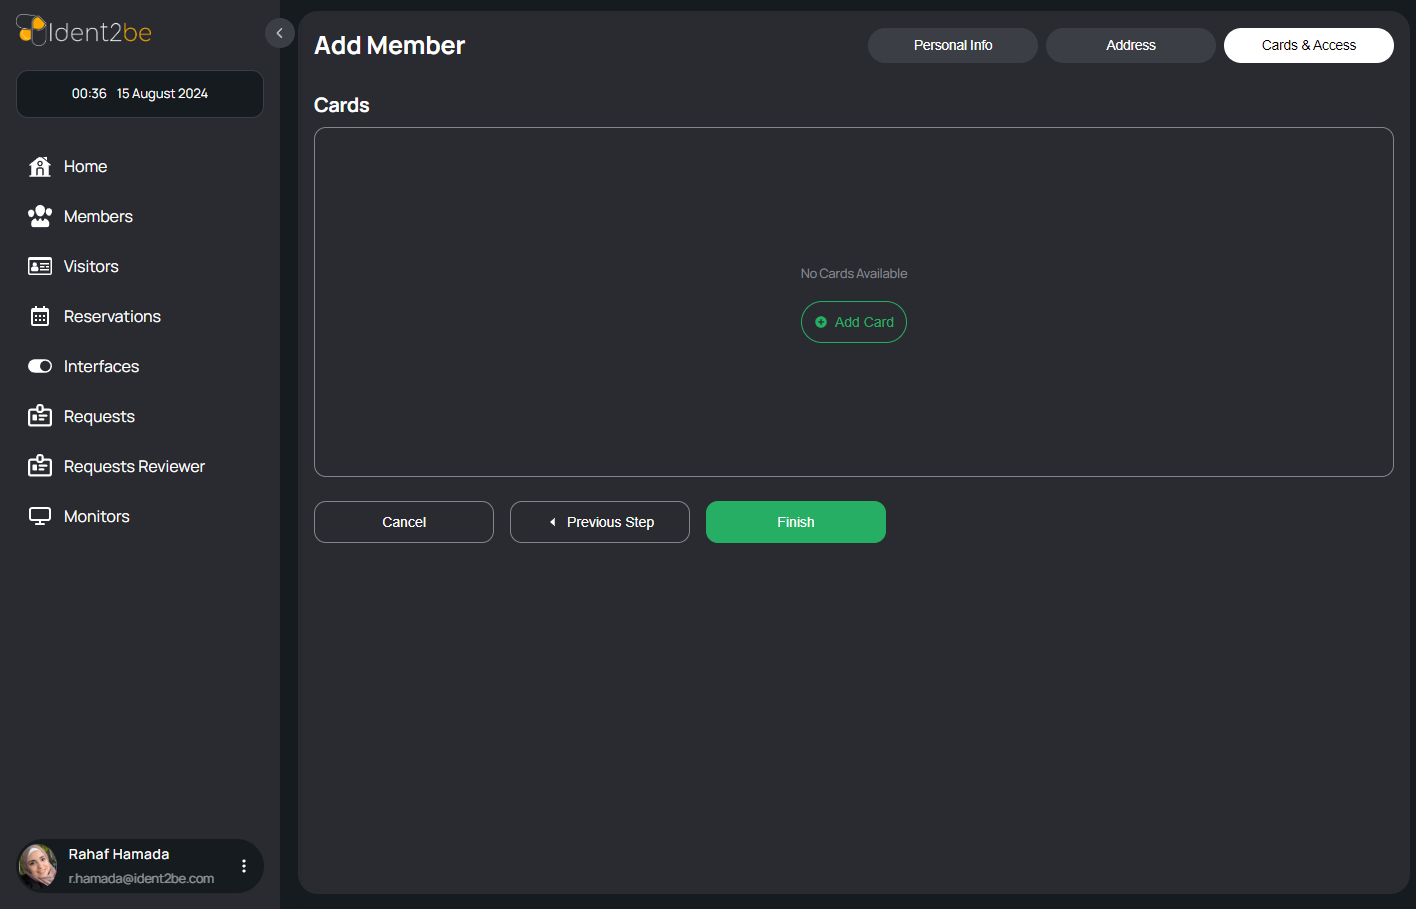
This tab is used to manage the cards and access rights associated with the member. The fields and functionalities include:
- Card List: A dropdown list where all cards associated with the member can be viewed.
- Add New Card: An option to add a new card, which could include fields like card number, type, and issue date.
- Card Status: Options to mark the card as active or inactive.
- Access Level: A dropdown or set of options to define the level of access the card grants the member within the company's premises or systems.
This tab is crucial for managing the physical and digital access rights of the member, ensuring they have the appropriate permissions to enter secure areas or access sensitive information.
How To Add New Member
- Personal Info Tab: This tab holds info for the member (full name and email are required).
- Address Tab: This tab holds member address tab.
-
Cards & Access:
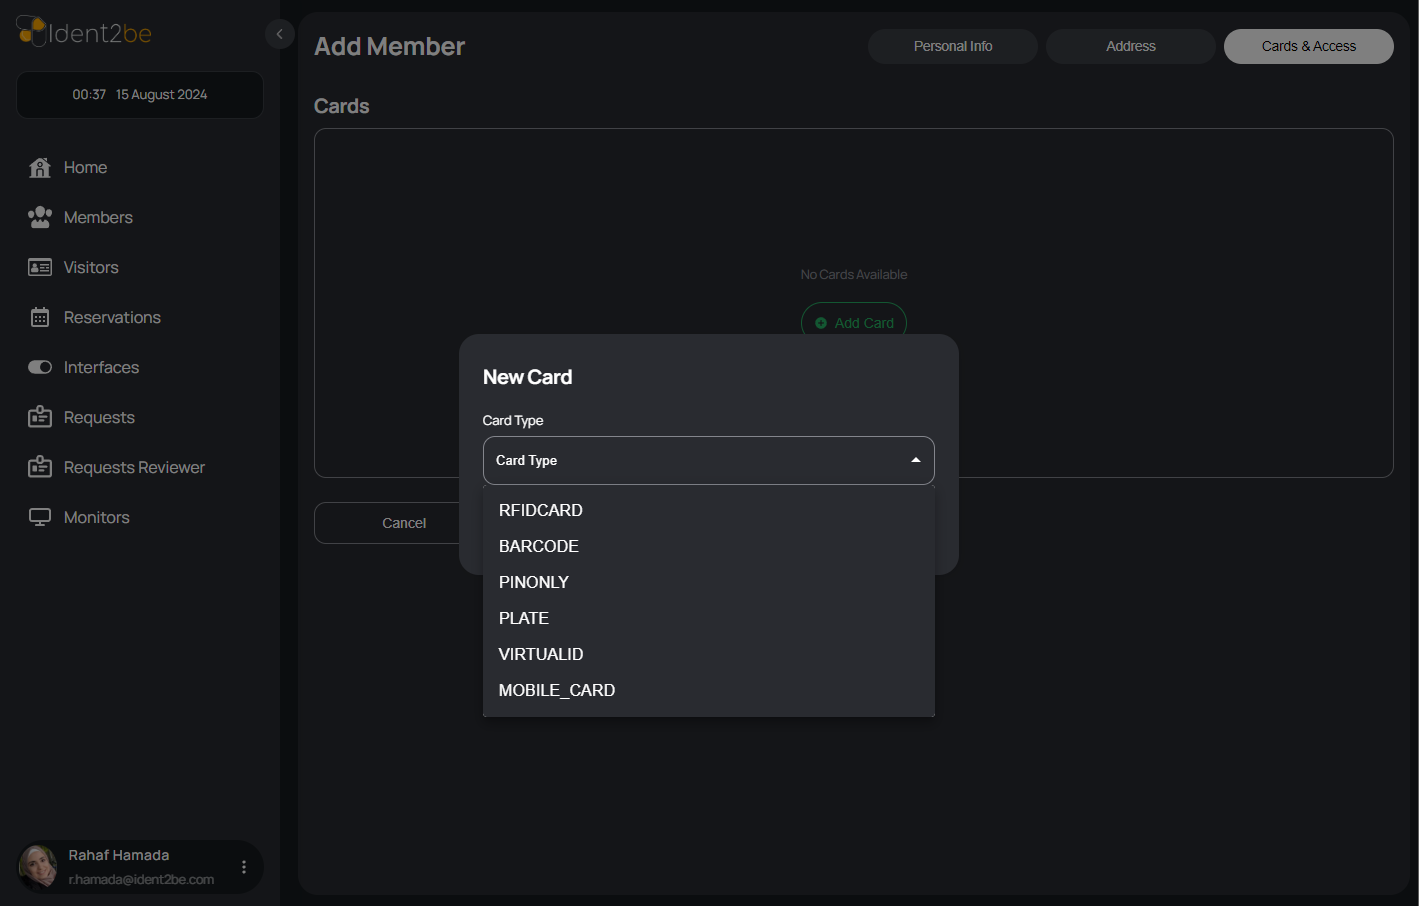
- Add Card Button: In this tab you add cards to the member by pressing add card then a popup will be opened.
- New Card Popup: In this popup you choose card type and insert data for this card ( card number is required ).
- Card Details: In this section you can see card details you added and can add access to this card in the table at the right.
- Card Details Actions: In card details section you have edit icon to edit this card and delete icon to delete this card.
Summary
The "Add Member" page is a comprehensive form designed to capture all necessary details about a company member. By organizing the information into three distinct tabs—Personal Info, Address, and Cards & Access—the page ensures a structured and thorough collection of member data, streamlining the process of member management within the company's system.
