Reservations: verschil tussen versies
(→Booking Page) |
(→How To Edit Attendees) |
||
| (6 tussenliggende versies door dezelfde gebruiker niet weergegeven) | |||
| Regel 89: | Regel 89: | ||
<li><strong>Date of Reservation:</strong> A date picker to select the desired date for the room reservation.</li> | <li><strong>Date of Reservation:</strong> A date picker to select the desired date for the room reservation.</li> | ||
<li><strong>Time Slots:</strong> Options to choose specific time slots during which the room will be reserved, ensuring availability during the event or meeting.</li> | <li><strong>Time Slots:</strong> Options to choose specific time slots during which the room will be reserved, ensuring availability during the event or meeting.</li> | ||
| + | </ul> | ||
| + | |||
| + | == How To Insert Booking Data == | ||
| + | <ul> | ||
| + | <li> | ||
| + | <strong>Number of attendees</strong>: Input with two arrows to increase and decrease attendees number. | ||
| + | </li> | ||
| + | <li> | ||
| + | <strong>Reservation date</strong>: Choose from this input the date of room reservation. | ||
| + | </li> | ||
| + | <li> | ||
| + | <strong>Time slots</strong>: Choose time slot to book the room you choose at a specific time. | ||
| + | </li> | ||
| + | <li> | ||
| + | <strong>Back button</strong>: Press it to go back to rooms page. | ||
| + | </li> | ||
| + | <li> | ||
| + | <strong>Book button</strong>: Press it to go to booking confirmation page to confirm this reservation. | ||
| + | </li> | ||
</ul> | </ul> | ||
| Regel 101: | Regel 120: | ||
<li><strong>Price:</strong> Displays the total cost of the reservation, calculated based on the room and time slots chosen.</li> | <li><strong>Price:</strong> Displays the total cost of the reservation, calculated based on the room and time slots chosen.</li> | ||
<li><strong>Confirmation Button:</strong> A prominent "Confirm" button that users can press to finalize the reservation if all the details are correct.</li> | <li><strong>Confirmation Button:</strong> A prominent "Confirm" button that users can press to finalize the reservation if all the details are correct.</li> | ||
| + | </ul> | ||
| + | |||
| + | == How To Confirm Booking Data == | ||
| + | <ul> | ||
| + | <li> | ||
| + | <strong>Booking details</strong>: You will find all data you entered plus the price of your reservation. | ||
| + | </li> | ||
| + | <li> | ||
| + | <strong>Back button</strong>: Press it to go back to booking page. | ||
| + | </li> | ||
| + | <li> | ||
| + | <strong>Confirm button</strong>: Press it to confirm this reservation with the given price. | ||
| + | </li> | ||
</ul> | </ul> | ||
| Regel 122: | Regel 154: | ||
<li><strong>Attendees:</strong> Input fields to add and manage the list of attendees for the event. This section allows for entering names and possibly other details of the participants.</li> | <li><strong>Attendees:</strong> Input fields to add and manage the list of attendees for the event. This section allows for entering names and possibly other details of the participants.</li> | ||
</ul> | </ul> | ||
| + | </ul> | ||
| + | |||
| + | == How To Interact With Attendees Page == | ||
| + | <ul> | ||
| + | <li> | ||
| + | <strong>Add attendee button</strong>: Press it to get an input to add attendee to the reservation (You can not add more attendees than the number of attendees you entered in booking page). | ||
| + | </li> | ||
| + | <li> | ||
| + | <strong>Delete attendee icon</strong>: Press it to delete the attendee you added. | ||
| + | </li> | ||
| + | <li> | ||
| + | <strong>Back button</strong>: Press it to go back to booking confirmation page. | ||
| + | </li> | ||
| + | <li> | ||
| + | <strong>Confirm button</strong>: Press it to confirm this reservation with the attendees list you added and go to all set page. | ||
| + | </li> | ||
</ul> | </ul> | ||
| Regel 133: | Regel 181: | ||
<ul> <li>Sections for modifying information of existing attendees.</li> </ul> </ul> | <ul> <li>Sections for modifying information of existing attendees.</li> </ul> </ul> | ||
| + | |||
| + | == How To Edit Attendees == | ||
| + | <ul> | ||
| + | <li> | ||
| + | <strong>Add attendee button</strong>: Press it to get new input to add new attendee to the attendees list. | ||
| + | </li> | ||
| + | <li> | ||
| + | <strong>Delete attendee icon</strong>: Press it to delete the attendee you added. | ||
| + | </li> | ||
| + | <li> | ||
| + | <strong>Back button</strong>: Press it to go back to all set page. | ||
| + | </li> | ||
| + | <li> | ||
| + | <strong>Confirm button</strong>: Press it to confirm this reservation with the given data. | ||
| + | </li> | ||
| + | </ul> | ||
== All Set Page == | == All Set Page == | ||
| Regel 143: | Regel 207: | ||
<ul> <li>Room Host: Input field for entering information about the person hosting the event or meeting in the room.</li> <li>Attendees: Input field to add and manage the list of attendees for the event or meeting.</li> </ul> </ul> | <ul> <li>Room Host: Input field for entering information about the person hosting the event or meeting in the room.</li> <li>Attendees: Input field to add and manage the list of attendees for the event or meeting.</li> </ul> </ul> | ||
| + | |||
| + | == How To Interact With All Set Page == | ||
| + | <ul> | ||
| + | <li> | ||
| + | <strong>Edit attendee button</strong>: Press this button to go to edit attendees page to add or delete attendee. | ||
| + | </li> | ||
| + | <li> | ||
| + | <strong>Done button</strong>: Press it to confirm the reservation operaton. | ||
| + | </li> | ||
| + | </ul> | ||
Huidige versie van 25 aug 2024 om 22:33
Inhoud
- 1 Reservations
- 2 How To Interact With Reservations page
- 3 Rooms Page
- 4 How To Book A Room
- 5 Booking Page
- 6 How To Insert Booking Data
- 7 Booking Confirmation Page
- 8 How To Confirm Booking Data
- 9 Attendees
- 10 How To Interact With Attendees Page
- 11 Edit Attendees
- 12 How To Edit Attendees
- 13 All Set Page
- 14 How To Interact With All Set Page
Reservations
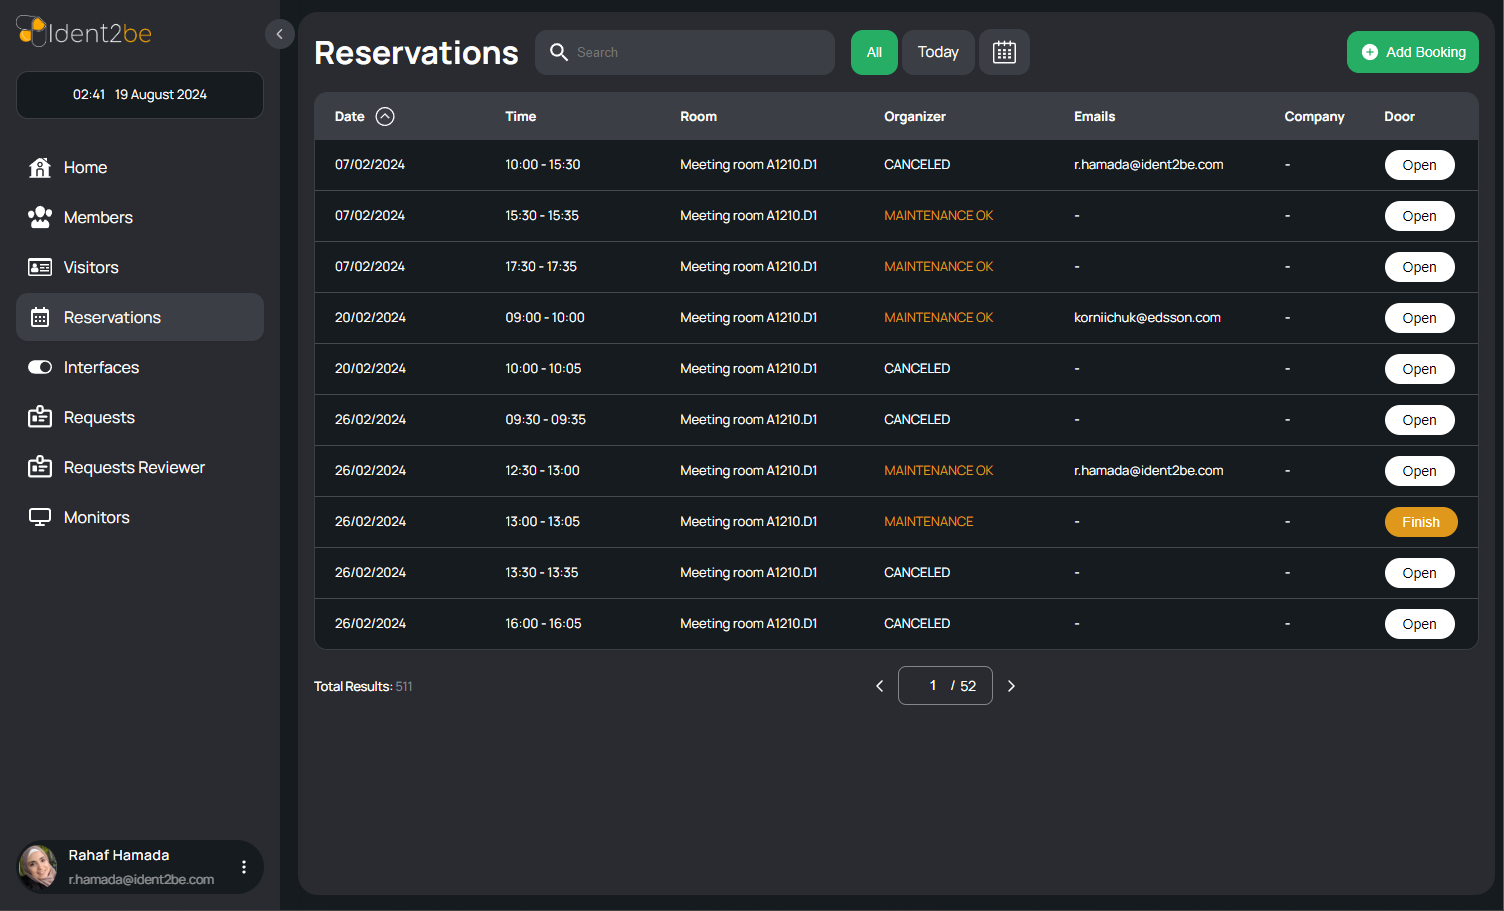
The Reservations page provides a comprehensive overview of all conference room bookings within the company. The page displays a table listing essential details such as the date, time, room, organizer, associated emails, company name, and door status for each reservation. Users have the option to open the door of the booked room directly from the page and can also initiate new room bookings via the "Add Booking" button, which redirects to the rooms page. This page facilitates easy management and monitoring of room reservations, ensuring smooth coordination of company events and meetings.
- Table of Results: The page features a table that lists all current reservations with the following columns:
- Date: Displays the date of the reservation.
- Time: Shows the time the room is reserved.
- Room: Indicates the specific room that is booked.
- Organizer: Lists the name of the person who made the reservation.
- Emails: Displays the email addresses associated with the reservation, typically those of the organizer and attendees.
- Company: Indicates the company involved in the reservation, if applicable.
- Door: A status indicator showing whether the door to the reserved room is open or closed.
- Open Door Button: A button is available for each reservation that allows the user to open the door to the booked room, providing immediate access when necessary.
- Add Booking Button: Located prominently on the page, this button redirects users to the rooms page where they can book a new room for their event or meeting.
How To Interact With Reservations page
- Search input: Type room name, email or organizer to search in reservations table.
- All button: To filter reservation results and get list of all results paginated with pages underneath the table
- Today button: Filters reservation details and get list of reservations list that have been booked in the current day.
- Calendar icon: Press it to choose date range and get reservations in the selected period.
- Add booking: This button will take you to rooms page to choose a room and book it in another few steps.
Rooms Page
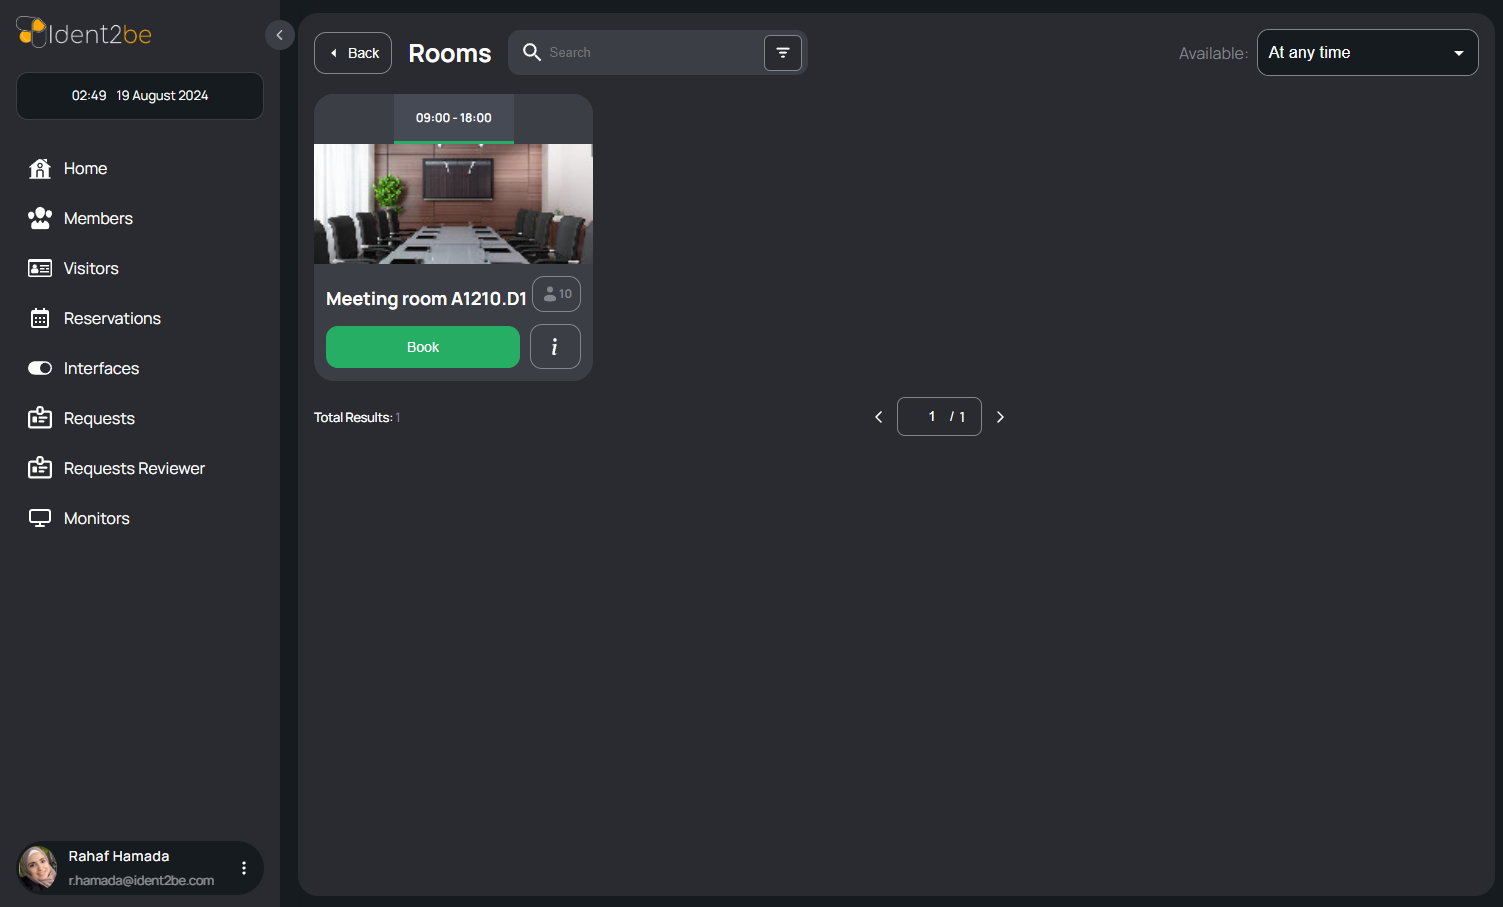
The Rooms page lists all available rooms, displaying their capacity and the time durations for which they can be booked. Users can filter rooms based on capacity, name, and available times, making it easier to find the right room for their needs.
- Room List: A comprehensive list of rooms available for booking, each displaying its capacity (number of people it can accommodate) and the time slots during which the room is available.
- Capacity Filter: Users can filter the list by room capacity, selecting rooms that meet the size requirements for their event or meeting.
- Name Filter: A filter that allows users to sort or search rooms by their names, making it easier to find specific rooms.
- Time Filter: Users can also filter rooms by available time slots, helping them find rooms that fit their scheduling needs.
How To Book A Room
- Back button: Press it to go back to the previous page.
- Search input and filter: Search by room name and capacity if you press on filters icon in search area.
- Select box: You will find options in this select box to filter rooms results like (at any time, now, at specific area), and if you choose specific date a date popup will be shown up to choose the period you want its results.
- Room box: You will find "Book" button to go to booking page and "info icon" button to open popup that shows room details.
Booking Page
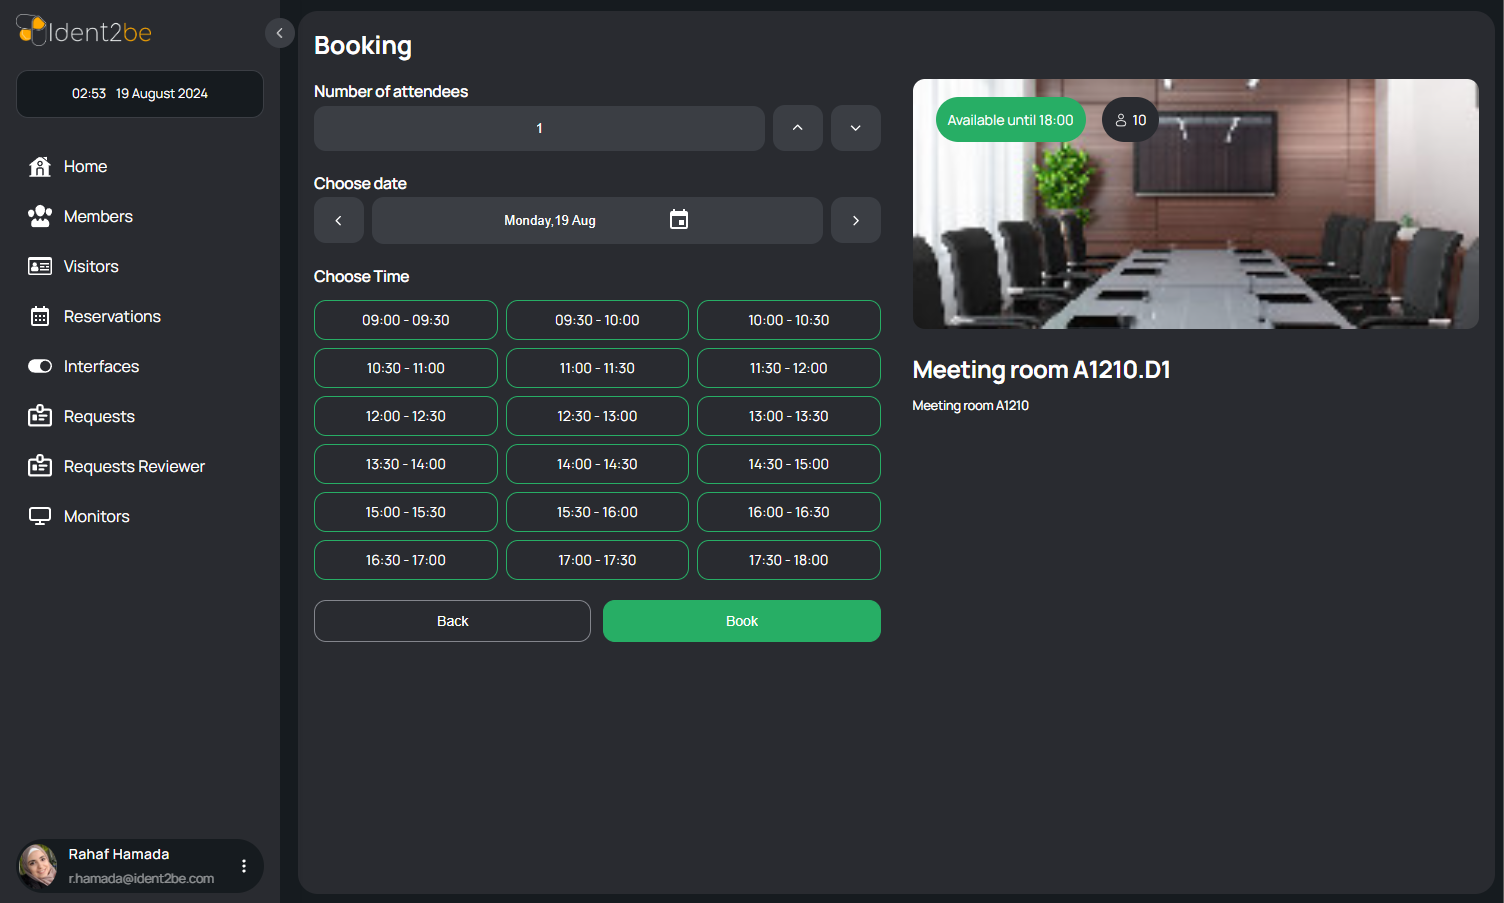
The Booking page allows users to view detailed information about a room, including its name, capacity, image, and description. Users can also input the number of attendees, select a reservation date, and choose time slots to complete the booking process.
- Room Details: Displays key information about the selected room, including:
- Name: The name of the room.
- Capacity: The maximum number of people the room can accommodate.
- Image: A visual representation of the room, helping users get a better idea of the space.
- Description: A brief overview of the room's features and any additional relevant details.
- Number of Attendees: An input field where users specify the number of people attending the event or meeting in the selected room.
- Date of Reservation: A date picker to select the desired date for the room reservation.
- Time Slots: Options to choose specific time slots during which the room will be reserved, ensuring availability during the event or meeting.
How To Insert Booking Data
- Number of attendees: Input with two arrows to increase and decrease attendees number.
- Reservation date: Choose from this input the date of room reservation.
- Time slots: Choose time slot to book the room you choose at a specific time.
- Back button: Press it to go back to rooms page.
- Book button: Press it to go to booking confirmation page to confirm this reservation.
Booking Confirmation Page
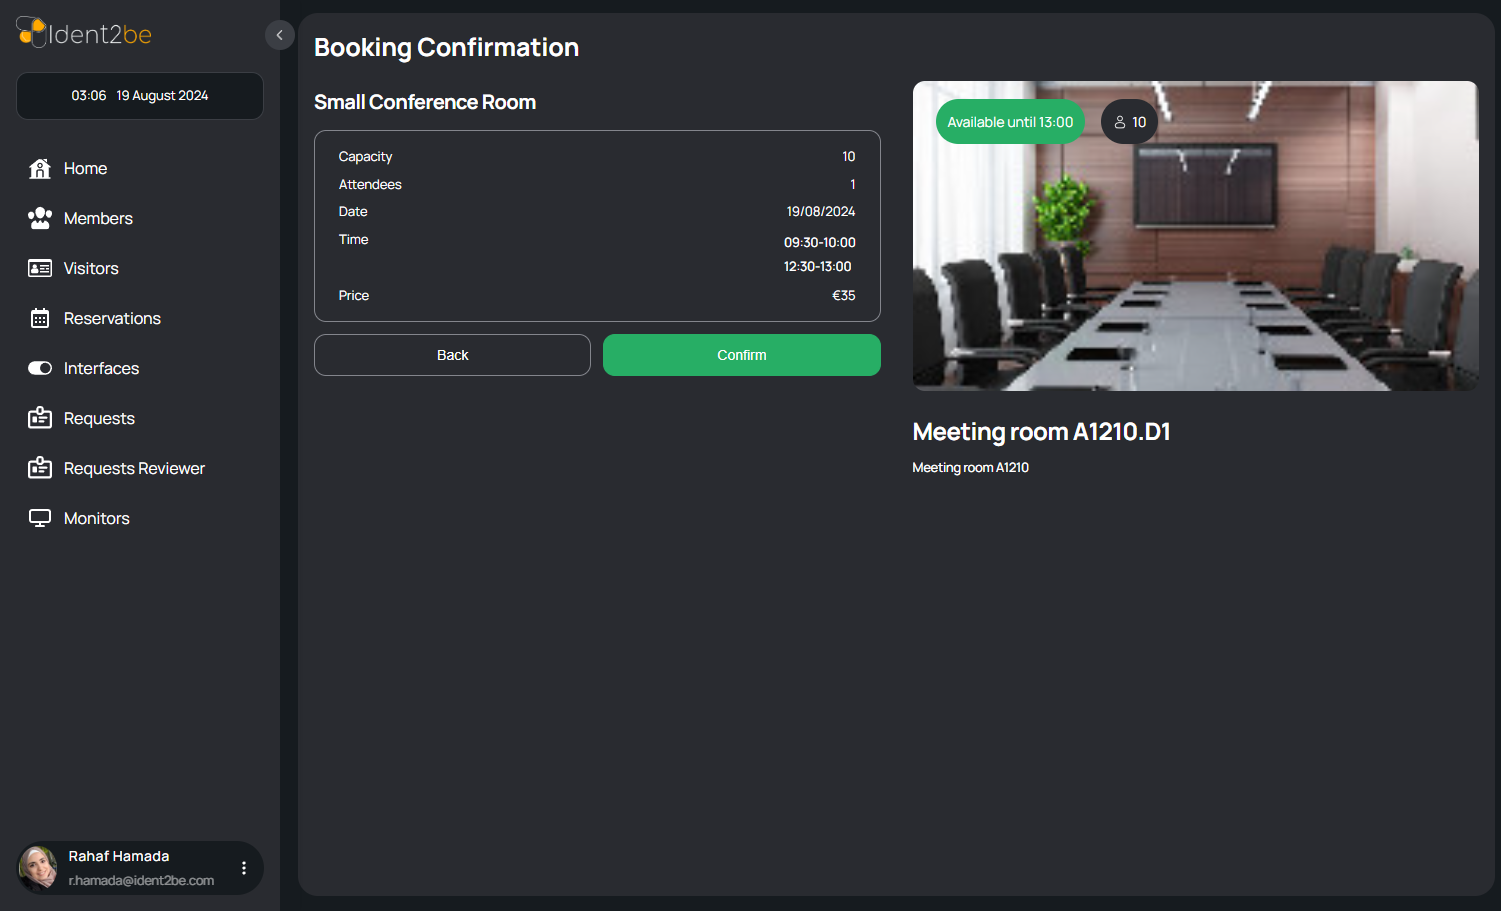
The Booking Confirmation page displays all the details of the selected room and the information provided on the Booking page, including the reservation price. Users can review these details and, if satisfied, press "Confirm" to finalize the booking.
- Room Details: Displays the room's name, capacity, image, and description, as well as the specific details entered during the booking process.
- Booking Information: Shows the number of attendees, reservation date, and selected time slots, as specified on the Booking page.
- Price: Displays the total cost of the reservation, calculated based on the room and time slots chosen.
- Confirmation Button: A prominent "Confirm" button that users can press to finalize the reservation if all the details are correct.
How To Confirm Booking Data
- Booking details: You will find all data you entered plus the price of your reservation.
- Back button: Press it to go back to booking page.
- Confirm button: Press it to confirm this reservation with the given price.
Attendees
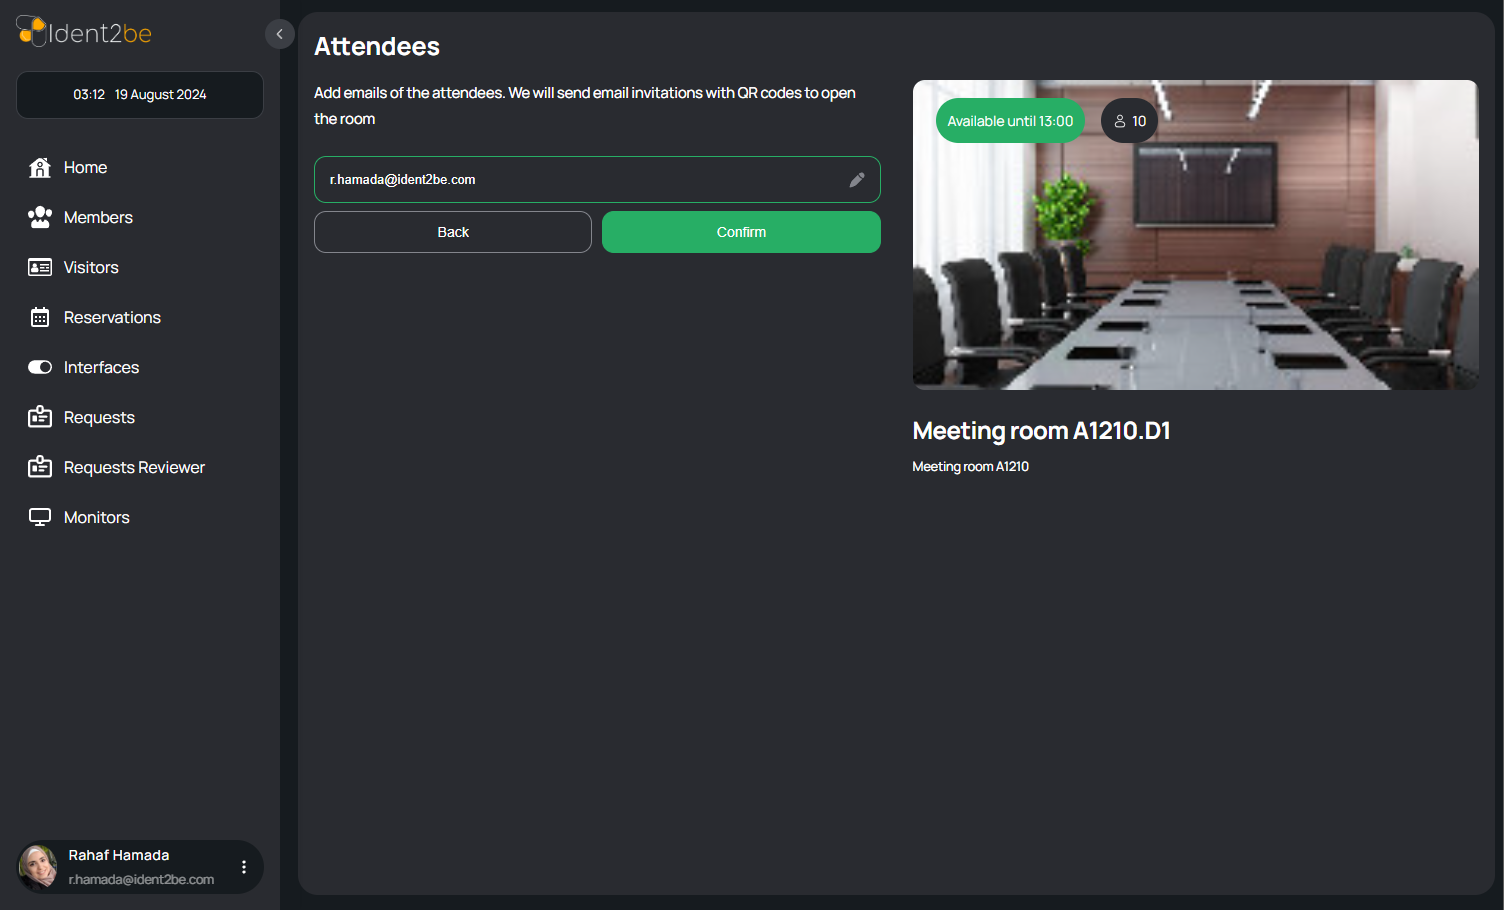
The Attendees Page is a crucial component of the conference room booking system, designed to streamline the process of reserving a room and managing attendee information. This page provides users with essential details about the room and facilitates input for key reservation elements. The page is structured as follows:
- Room Details
- Capacity: Shows the maximum number of people the room can accommodate.
- Name: Displays the name of the room.
- Image: Provides a visual representation of the room.
- Description: Offers additional details about the room's features and amenities.
- Reservation Inputs
- Room Host: An input field for entering the information of the person hosting the event or meeting.
- Attendees: Input fields to add and manage the list of attendees for the event. This section allows for entering names and possibly other details of the participants.
How To Interact With Attendees Page
- Add attendee button: Press it to get an input to add attendee to the reservation (You can not add more attendees than the number of attendees you entered in booking page).
- Delete attendee icon: Press it to delete the attendee you added.
- Back button: Press it to go back to booking confirmation page.
- Confirm button: Press it to confirm this reservation with the attendees list you added and go to all set page.
Edit Attendees
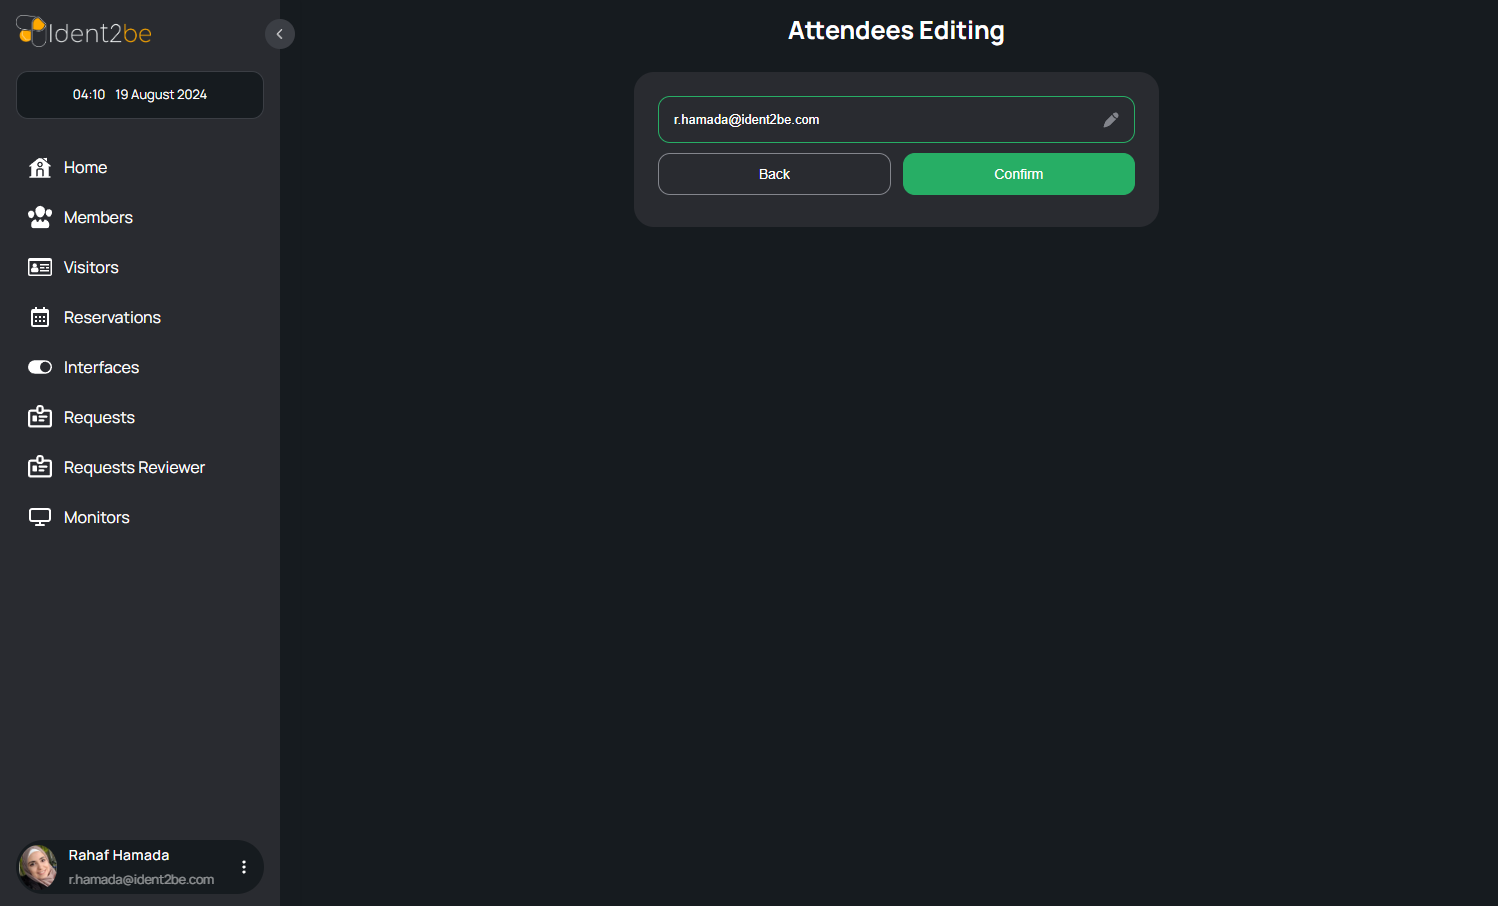
The Attendees Edit Page allows users to manage attendee information by adding new attendees or editing existing ones. The page structure includes:
- Add New Attendee
- Input fields for entering details of a new attendee.
- Edit Existing Attendee
- Sections for modifying information of existing attendees.
How To Edit Attendees
- Add attendee button: Press it to get new input to add new attendee to the attendees list.
- Delete attendee icon: Press it to delete the attendee you added.
- Back button: Press it to go back to all set page.
- Confirm button: Press it to confirm this reservation with the given data.
All Set Page
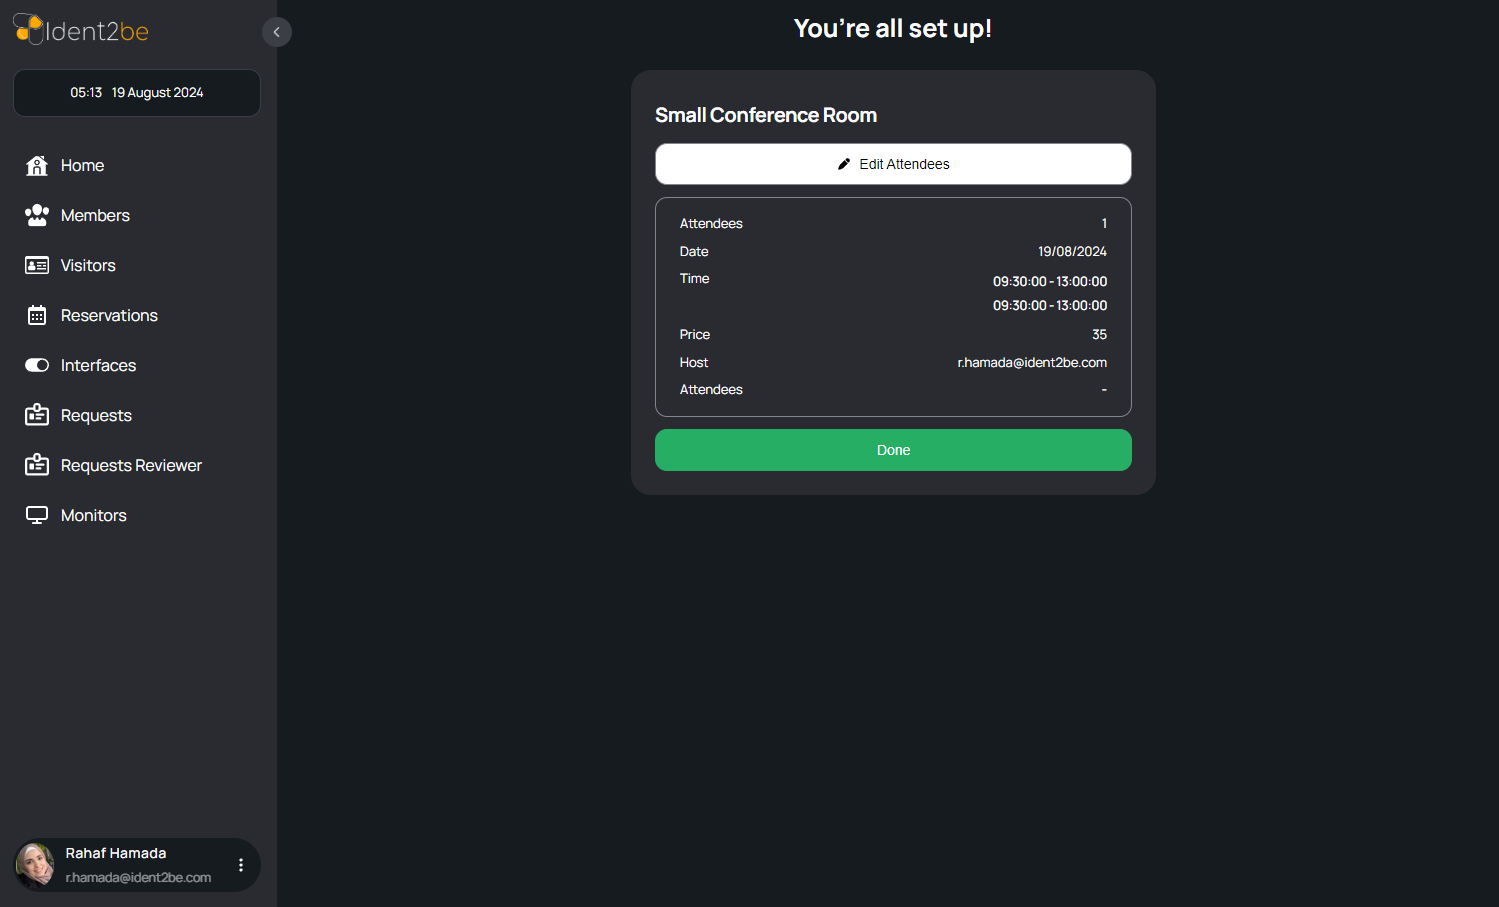
The All Set Page provides a comprehensive overview of room reservation details. Users can access vital information about their bookings, including room capacity, name, image, and description. Additionally, the page allows users to input reservation details such as room host and attendees, facilitating efficient management of reservations.
- Room Details
- Capacity: The maximum number of people the room can accommodate.
- Name: The name or identifier of the room.
- Date: Reservation date period of the room that can be accessible in this duration
- Time: Time slot reserved for this conference room.
- Reservation Inputs
- Room Host: Input field for entering information about the person hosting the event or meeting in the room.
- Attendees: Input field to add and manage the list of attendees for the event or meeting.
How To Interact With All Set Page
- Edit attendee button: Press this button to go to edit attendees page to add or delete attendee.
- Done button: Press it to confirm the reservation operaton.
